Hello!
Appium is an open-source, cross-platform tool to automate native, mobile web, and hybrid apps. Appium works well on both native and hybrid applications. If a company relies on the iOS or Android SDK to create its apps, it can use Appium without any problems. Appium automation helps you automate testing of mobile web apps that are accessed using a mobile browser.
 Given that Webview is used in many hybrid apps, There are a few features that make Appium stand out from the crowd.
Apart from being powerful and simple to use, what I like the most is its flexibility.
The way you can execute test cases on any device, without modifying your code for different platforms, just makes things so simple. It is free software for testing mobile apps.
Whether you’re new to testing or a veteran, Appium makes it easy to automate your app on iOS and Android.
Verify That The Android Application Is Preinstalled
It’s very common for developers to want to check whether their Android app is already installed on a device or not. There are many reasons for doing this, but the most common is to use a part of the app that is only accessible to logged-in users. For example, if testing a login process. Whenever you execute your test case, the first step is to log in. This is a time-consuming operation (from an execution perspective).
Enabling The Mouse Pointer Location On Android
The mouse pointer in Android Device Monitor is hidden/not visible while capturing UI element locators. To view the mouse pointer location, you need to enable Pointer Location from the Developer Options.
 When running tests with Appium, it is a very common scenario to want to know or to see where the device mouse pointer or touch is on the test devices, with this information you can debug your app and make sure where your test is cases are really tapping and clicking.
Appium provides a way to get the co-ordinate of the mouse pointer and you can use that coordinate accordingly.
Tracking mouse pointer location is an essential step for any testing framework in order to debug why a certain action failed. The first and the most common reason for any failure is that the elements that you are trying to interact with are not displayed or invisible due to which your swipe, tap, and scroll action will fail. Knowing the device mouse pointer or touch is on the test devices will help you to debug your app and make sure where your test cases are really tapping and clicking.
Process For Capturing Screenshots On Test Failure
Appium can capture a screenshot of the screen. The main advantage of this feature is that you can use it to debug your tests.
For instance, if you see a successful test run in your console, but when you look at the simulator/emulator, you can see that the tested functionality didn’t work, then this is where taking screenshots plays a vital role because you can see what happened during the automation test and thus figure out what went wrong. Whenever a failure occurs in your test, this will capture the screenshot and most probably save it in your report folder. You can quickly evaluate the reason for the failed test just by looking at the screenshot.
-
Dismissing Alerts On Android Appium
 There are two ways of dealing with system dialogs and popups using Appium: manually, or automatically.
Automatically is fairly simple: all you have to do is set the desired capabilities in your test script so that Appium will automatically accept or deny the alert/dialog.
If you want to handle it manually, you first need to locate the locators of the allow/deny button on the popup/dialog element and then perform a click() action on it.
Appium Can Handle The System Dialogs/alerts In 2 Ways:
- Manually: In this approach, you have to find the locators of the allow/deny button of the element and then perform a click() action on it.
- Automatically: You can set the desired capabilities to auto accept or deny the alert/dialogs.
Setting the Capabilities:
- Setting the capability autoAcceptAlerts to true will accept the alert automatically.
- To set the capability autoDismissAlerts to true will dismiss the alert automatically.
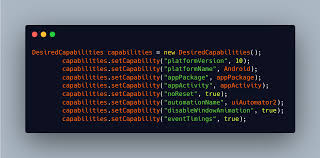
You Can Use The Following Code To Dismiss Dialogs Automatically:
 DesiredCapabilities cap = new DesiredCapabilities();
cap.setCapability(“autoAcceptAlerts”, true);//it will automatically accept the alerts
cap.setCapability(“autoDismissAlerts”, true);//it will automatically dismiss the alerts
Push Notifications And Notification Management
Push notifications are a common thing in mobile applications and they can be handled using Appium very easily. They are there for when you’re in the middle of doing something and need to know that there’s important information in another app. Android gives developers the ability to set up push notifications in their apps, and Appium has made it easy to test them with just one method call.
A push notification is a message that pops up on a mobile device. Appium has the capability to handle these push notifications by using the open notifications() method. The title and body of the notification can be retrieved by using locators such as android: id/title and android: id/text respectively.
You can tap the notification to dismiss it, or you can use the background app(seconds) method to send your app to the background for some time. This will also dismiss any notifications that might have popped up during that time.
 When you use Appium’s open notifications() method, it will open the list of push notifications you’ve received while your app was open.
The title and content of each notification is displayed along with an icon that is relevant to the notification, making them easy to understand at a glance.
Now when you’re testing your app, you can be sure that your notifications are sent at the right time and are easily discernable by making sure they show up in your list of notifications!
Failing Test Cases Faster
Have you ever been writing a test case, and you know it should fail, but the test case is taking so long to complete that you’re getting incredibly impatient? Or maybe you have a test case that isn’t falling fast enough to get the error message and fix it. Well, we have the solution for you!
Although Appium is a very powerful framework and it makes testing mobile apps a lot easier, some errors can be hard to debug. In such cases, you might want to reduce the time that Appium waits for your next command until you find the issue with your test case.
For example, if you have an Android app where the screen should normally display a search bar and 2 buttons but instead shows an error message that looks like “Error X: please try again later” – if Appium waits for too long for your next command, you might miss that error message and not realize there’s an issue with your mobile app.
Using the new command timeout desired capability you can specify the time in seconds for which Appium will wait for a new command from the client before assuming the client quit and ending the session.
 This is most useful when you want to fail your test cases quickly if there is some error that would otherwise cause your tests to hang indefinitely.
For example, if Appium can’t find the element you’re looking for or if an exception gets thrown while performing an operation on an element, it would take a while before Appium realizes that something went wrong and times out.
In such situations, specifying a lower value for newCommandTimeout will cause your test cases to fail more quickly.
You can also use this setting in situations where you have a lot of long-running scripts running on an emulator/simulator and need to quickly clean up these sessions when they become unresponsive.
Writing Test Cases At A Speedier Pace
Have you ever been under pressure to deliver more, faster… but couldn’t?
You’re not alone.
But luckily, there are ways to keep up with the demands of your job while still maintaining a high standard for quality control. Here are some of our best tips for writing test cases faster. It’s not hard, and it’s not even as time-consuming as you’d think. All it takes is a little bit of tinkering with how you approach your testing, and you’ll be writing test cases faster than you can say, “Appium.”
 For example, if you’re using Appium for your testing, there are some things you can do to speed up the process.
Implementing these strategies will help you get more done in less time.
1) Use a local appium server and local device: Appium performs the best with a locally installed appium server and having the script execute on a physically connected real device. Save the cloud device testing for increased coverage testing and for full regression tests.
2) Extract all the UI element locators of the application at first go: You can simply navigate the whole app with Appium Inspector (or another tool) and note down all relevant Ids, text or class name for the UI elements. The objective here is to save time by getting all the element locators at first go, so you won’t have to find the locator of element when you are in the middle of writing your test case.
3) The easiest way to write tests that will stand the test of time is to make sure every UI element has a valid and unique id. We know this isn’t always possible, but if you work with developers to ensure unique ids are used whenever possible, you’ll save yourself a LOT of grief down the road.
The next best thing is making sure elements have names or classes that are unique. If you can use the name or class of an element as a locator, it’s less likely to change unexpectedly and break your tests.
 But sometimes, there’s just no other choice than XPath. When your app is changing constantly and unique IDs aren’t available, XPath may be the only reliable way to find elements on the page. But even when you’re using XPath for locators, there are some easy ways to make your tests more resilient:
Whenever you find yourself using an index in your XPath locators (like //span[2]), stop to ask why and see if you when your application under test changes, it can be a pain to update your test cases.
To make sure you’ve got the best tests in place and save time when things change, collaborate with developers before you start writing code.
Changing Context Types During Testing
If you’re using Appium to test an Android application, you’ll need to constantly switch contexts between native and webview. While we are working with a native application, the context will be NATIVE. And when webview is being used on some screen it will have the WEBVIEW context.
You can see what contexts your app currently has by running driver.getContextHandles(). This returns a set of strings, each one representing a different context your app currently has available. You can switch between them by calling driver.context() with one of those strings as its argument:
driver.context(“WEBVIEW_1”)
Viewing The Available Contexts
There is a method called getContextHandles() which will return a set containing all the available contexts in your application. You can use that to verify if you need to switch your context or not. Let’s print out all the available contexts and see what we get:
“Set<String> contexts = driver.getContextHandles();
for (String context : contexts) { System.out.println(context); }
The output below shows the two contexts that are available for this application: NATIVE_APP and WEBVIEW_1.
[“NATIVE_APP”, “WEBVIEW_1”]
Switching Between Context
 Now that we know we have two types of context, let’s switch to web view so we can assert the title of the payments page (in web view).
driver.context(“WEBVIEW_1”); // Set context to WEBVIEW_1 String webviewTitle = driver.getTitle(); System.out.println(“Web View Title: “+webviewTitle); assertEquals(“Payments”, webviewTitle);//Assertion returning true
Automate your mobile app testing on real devices. LambdaTest connects your apps to the cloud, and provides a platform of thousands of real devices and mobile emulator online.
LambdaTest Appium Cloud For App Automation enables you to test native, hybrid and web apps across 3000+ real devices and OS combinations.
Other features of LambdaTest App automation platform:
- Parallel testing to speed up your test execution by multiple folds, get early feedback on code commits, and reduce costs associated with finding issues in advanced stages.
- Detailed insights in tests logs to help you debug on the go.
- Integrate LambdaTest test automation cloud with your favorite continuous integration tools using native plugins for Jenkins, CircleCI, Travis CI, and more.
Thank you!
Join us on social media!
See you!


