How to Verify NFT Ownership?
What is Verify Contract Address Ownership?
As an improvement to our previous NFT update process, users now can have their ownership of a contract address be verified and tied to their QUASA NFT account.
Previously, Quasa adopts a signed message method where the owner of the smart contract will need to sign a message claiming ownership of the particular contract for every submission.
The signed message is a security step to ensure that only you are the owner of the contract/key address that was used to create your NFT.
Moving forward, once a user has claimed ownership of a contract address, the user will be able to update their NFT information and address name tag without needing to sign a new message for future submissions.
The contract owner can verify ownership of multiple addresses under a single Quasa’s account.
To have an address verified, the user would need :
- A QUASA NFT account
- To have signed a message once to verified ownership of each address
How to Verify Contract Address Ownership?
Verify NFT Ownership process involves verifying the ownership of a smart contract address with the address used to create the NFT and then linking the contract address to the owner's Quasa account.
Before claiming ownership of your contract address that was used to create the NFT and obtaining an NFT ownership certificate, make sure that:
- the source code has already been deployed onto the blockchain
- the source code has already been verified
The steps to verify your contract address ownership explained:
Step 1: Log into your QUASA NFT account (if you do not have an QUASA NFT account, you can sign up for an account)
Step 2. After you are logged in, click "Verify NFT Ownership" in the menu, copy the signing message on the screen that opens.
Step 3. Go to MyCrypto.com and sign the copied message.
You will be provided options to sign the message with your wallet interface by clicking on the "Sign Message Manually" button or sign with Web3 (Metamask).
Sign this message with your key that was used to create the NFT. (This is a security step to ensure that only you are the owner of the contract/key address that was used to create your NFT.)
Follow the below steps to sign using Web3 (Metamask)
Step 1: Upon clicking on "Connect to Web3", you will be presented with the interface to log into your Metamask account.

Step 2: Once logged in, a Connect Request for 'Verify Address Ownership' from Etherscan.io will pop up. You are required to click on Connect to be able to sign the message.

Step 3: Kindly check the details in the message and if all is correct, you can proceed to sign the message by clicking on the Sign button.

Step 4: Upon signing the message, you will need to click on the Click to Proceed button.
Step 5: You will be directed to the page below where the address, message, and signature hash have been prefilled. Click on Verify Ownership to proceed.
Step 6: You should be seeing a page that says you have claimed the ownership of your contract address.
Follow the steps below to sign using your wallet interface (MyCrypto)
Step 1: Copy the message template
Step 2: For this step, open a new tab and head on here and choose any of your preferred service providers that provide message signing feature.

Step 3: After choosing the above options, you will be presented with the steps to connect your wallet and a small popup at the top right corner of the browser will appear from MyCrypto asking permission to connect to your account. Click Connect and paste the message you copied in Step 1 into the input field and click Sign Message.

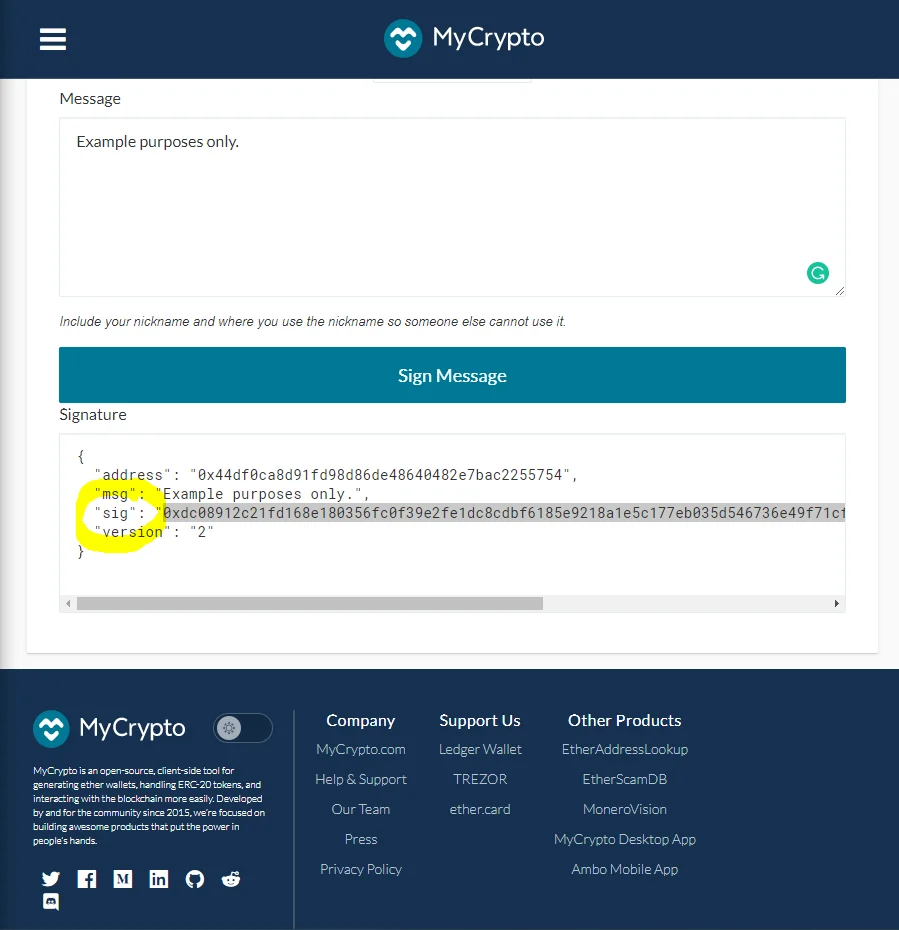
Step 4: After you have signed the message, another box will appear under the Sign Message field. This box contains the details pertaining to your signed message and the signature hash resultant of the message signature. Inside the box, copy the value next to “sig”: and make sure to copy the whole string starting from right after the first “ and ending just before the last “ (or simply double-click on the string of characters and copy it)

Step 5: Once you have copied the signature hash, return to the QUASA NFT tab and paste the copied hash into the Message Signature Hash field and click on the Verify Ownership button.
Step 6: If every step was done correctly, you should be seeing a page that says you have claimed the ownership of your contract address.
Now that you have claimed the ownership of your contract address, go back to QUASA’s homepage and try clicking on Verified Address on the dropdown menu under your username. You can see that your contract address is now listed there and you can proceed to Certify the information of your NFT directly from that page without needing to sign another message.
How to Verify Ownership of NFTs?
Step 1: In QUASA NFT, select the address/key that was used to create your NFT and that you have confirmed in Mycrypto.com and click "Use this key".
Step 2: Select your NFT marketplace, click the menu "My NFT marketplace"

Step 3. Select your NFT on the marketplace

Step 4. Click "Create ANFT" in the bottom menu of the application.
A pop-up window will appear, in which click "OK" and confirm the import of NFT from the marketplace and the creation of an active NFT (ANFT).
Step 5. Go to your ANFT collection.
Here are your active NFTs (ANFTs) imported from the NFT marketplace.

Step 6. Issue a Certificate confirming the ownership of your NFT.
Click on one of your ANFTs

The certificate confirming the ownership of your NFT is ready in PDF format.
You can print it, share it with others from the app, or make it an active NFT, that's also possible.
Now you can add information to your ANFT for free, add metadata, and publish your ANFT to the Metaverse, completely secure from theft.
Thank you!
Subscribe to our newsletter
Get the latest Web3, AI, and crypto news delivered straight to your inbox.