Hello!
Some of the Windows Live Mail users want to stop using it and move towards the trending email client. Nowadays, the top-most ranked email client is Microsoft Outlook among the users. Today, Outlook is one of the trusted and efficient email clients, that’s why users are looking forward to export Windows Live Mail to Outlook on another computer. Go through this article to find an accurate solution for your concern.
Before going to know the methods, first, you should know the reasons for this conversion process.
Why do users want to export Windows Live Mail to Outlook?
As Windows Live Mail no longer supported by Microsoft, users want to stop using it. It doesn’t work properly with Microsoft Exchange due to its supportability. The system can stop at any time. Therefore, users look for solutions to migrate from it to other supported email clients like Outlook.
Some other reasons:
- Windows Live Mail only consists of calendar facilities while Outlook includes tasks, notes, contacts facilities.
- Outlook works easily with the Microsoft Exchange but Windows Live Mail doesn’t support it.
- Windows Live Mail not included with a programming interface but Outlook has the advanced features.
Now, let’s move ahead to know the manual solutions for exporting the Windows Live Mail emails to Outlook.
Manual Tricks & Techniques to Export Windows Live Mail to Outlook on another Computer
There are two manual methods for it as given below:
- Using the Microsoft Exchange option
- Using the Windows Live Mail File Path
Also read: Top 6 Tips to Stay Focused on Your Financial Goals
Method 1: Using the Microsoft Exchange option
Windows Live Mail consisting of an export functionality that directly moves WLM mail items to Microsoft Exchange. From Microsoft Exchange, you can easily download the files in PST format. Then import those downloaded PST files through Import/Export feature of Outlook. Now, follow the below steps:
Steps to Export Windows Live Mail items to Microsoft Exchange
1. Firstly, Launch and start the Windows Live Mail email client and Hit the File menu>> Export email >> Email messages.
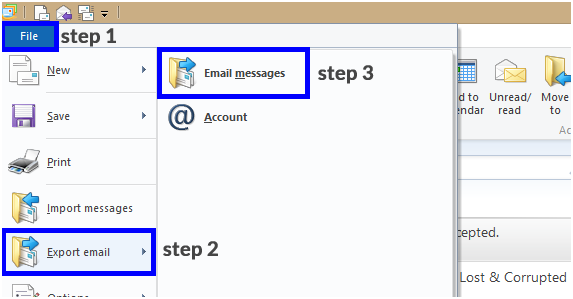
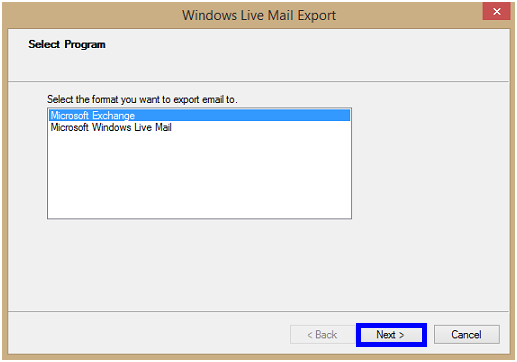
2. Now, select the Microsoft Exchange option that appears next and press Next.
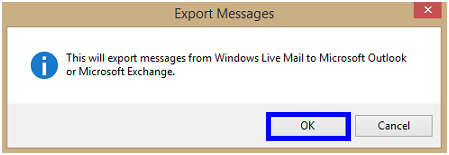
3. Then a message will appear as shown below. Tap on OK to continue.
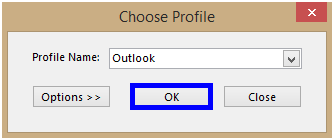
4. A profile name dropdown comes next, choose Outlook from it and press OK.
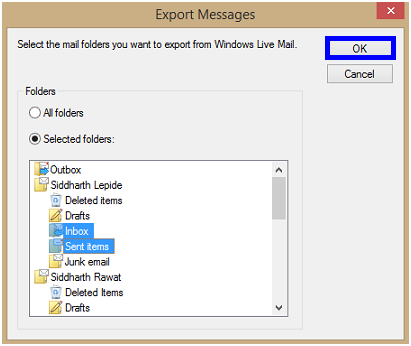
5. Now, in the Export Messages dialog, choose any of the one options as per your need from All folders or Selected folders Hit OK.
6. After this, the Export process will start.
7. Wait for the successful completion. Then after completion, you will receive a confirmation message.
8. At last, check the status of the process by opening the Outlook application.
Through the following steps, your WLM mail items exported successfully to Exchange. Now, you can easily download these emails in PST file format. After that, import the PSt file to Outlook by following the below steps:
Steps to Import PST to Outlook:
- Start the Outlook application first.
- Now, navigate to the File menu >> Open & Export >> Import/Export.
- Now, a wizard will appear, choose the Import from another program or file option and press it.
- A new window appears, hit on Outlook Data File (.pst). Then press the Next
- Now, visit the Import Outlook Data File window and look for the PST files to be imported.
- If the PST file is protected through a password then type the password and hit on OK.
- For saving the imported files, choose the folder.
- Hit on the finish button to start the Import process.
- The exported PST files appear on the left panel. Then create a new folder and drag and drop those files into it.
- Hence, all the PST files now imported into Outlook successfully.
Method 2: Using the Windows Live Mail File Path
 You can also move WLM files from the system’s path. Generally, WLM files are stored in EML formats. If you want to shift those files into another system then it can be done by configuring Outlook client in the new PC. You have to just drag and drop all the EML files to the newly created folder in the Outlook email client. Follow the stepwise procedure through the below steps:
- Find the WLM files in your PC by visiting the below path:
- C:\Users\[Username]\AppData\Local\Microsoft\Windows Live Mail
- Now, copy all the files to a storage device.
- Then connect that storage device with the new PC where you want to transfer the files.
- Now, start the Outlook application and create a new folder(WLM).
- At last, drag and drop those WLM files to this WML folder.
These manual methods consume a lot of time and may become complex ahead. As we all know that Windows Live Mail store the files in EML format and Outlook store in PST format, so it is better to use a direct utility to convert Windows Live Mail to Outlook. Therefore, you can use EML Converter for transferring all your EML files into PST file format quickly. Later the PST file will be imported easily in Outlook. Also, this utility works with all Windows versions and ensures no data modification and loss during the conversion process.
Conclusion!!
We hope you’ll find this guide useful for exporting Windows Live Mail items. Important reasons and two manual methods have been provided to export Windows Live Mail to Outlook on another computer. Also, if someone wants a direct method, use the given excellent utility. With the direct method, no need for technical knowledge required. It is the best part of it that’s why users mostly prefer software than manual procedures.
Thank you!
Join us on social networks!
See you!

